Chroma Key Screen is Gone Without Live Green Screen Software


Making use of live green screen software as part of your home video studio can be very simple and easy not quite as complicated as you may think. It really is widely used in Hollywood for creating films that could preferably be impossible to build under certain situations a result of the impracticality with shooting in the location. Chroma key screen allows the movie maker as a way to generate any background, she or he desires with no constraints.

Although it has been popularized in Hollywood it's being a little more accessible to anyone who wants to use this kind of technology. It is possible to set up your personal Photography Studio acquainted with just about the limited effort. The live green screen software involves manipulating images and replacing one particular colored background with any images that you digitally create with editing software. All you will need is a chroma key screen or backdrop and hang it within a place in your home that will have enough space for you to step up a simple studio. Ensure that you measure the area carefully so you will know the size of the screen you will require.

You may purchase your chroma key screen and find everything you will require; the screen, the live green screen software, and Lighting guide. With the editing software, you will have access to simple editing process that will aid in editing your images and replacing your screen while using the background you would probably prefer to have. You can either use blue screen or green chroma key screen as your background, because it's the two furthest colors from any skin tone. Red is also sometimes used professionally. It really is important to remember not to allow the subject of this image not wears any clothing that will be exactly the same color as the background because in the editing process this part of the image might be ‘keyed’ (removed) out of the picture along with the background.

Lighting is a necessary aspect of the chroma key process because it will determine how the image's will turn out. Having shadows or sometimes a disparity with the brightness of your background will result in an uneven process, and the particular parts will be outside of the collection of colors for the chroma key lights. The remainder of the process will involve the editing portion that will either be post production or during real-time video if you are using the live green screen software conducting a weather broadcast where the background will undoubtedly be added in the shot.

No matter what purpose of making use of the Green Screen, you'll find to be incredibly easy to apply and everybody near you will simply benefit from the outcomes of your home editing. You don’t need to be a specialist to get yourself a professional result. All you need is your chroma key screen and some creativity!


Enhanced by Zemanta

Monday, October 11, 2010

GreenScrenn Studio So Easy For Beginners

Greenscreen studio is the perfect solution for making creative videos in every house. Amazing results no previous experience is needed, every mom and dad can use it on a low budget. Have you heard about greenscreen studio or green screen technology?

The term seems for us the non technological people a combination of fear and desire. We dream about it but we do not dare to try and use it. Don't let it frighten you any more it is in the reach of your finger tips.

Beginners Greenscreen Studio

After recording your video in your home greenscreen studio you will obviously want to replace the green screen recordings with your own new backgrounds.

This process is called chroma keying. Keying a color means selecting a color and removing every instance of a selected color in the image. It will make the background that is placed "behind" this image then becomes visible.

2 Common ways the greenscreen studio works:
1. Using a special effect generator
2. Using editing software

My advice to beginners in their couple first experiences is to use post-production methods in their greenscreen studio because it is easier and most common.

Green screen program may have a different variation and different editing process. However, the general process for most applications is the same.

Here are basic steps to operate your green screen program:
1. Place the green screen data on a layer in the timeline.

2. Place the background data or image on a layer below the green screen data.

3. Add a green screen effect to the top layer.

4. Select green as the color to use in the key. (Most software provides a color picker to help you do this).

5. After selecting the color, parts of the image will become transparent, and you should see the background appear in these parts. Adjust various parameters to get the best effect.


Greenscreen Studio - Is It All About Lightning?

OK we have overcome the fear from computers and programs but what about that dreadful thing called LIGHTNING.

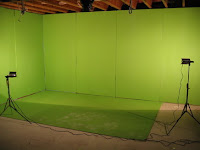
Operating any greenscreen studio has to do with its own lightning requirements. It is highly unlikely that you would be able to use the screen with existing ambient lights of your house or the same light you use to light your foreground subjects on stage.

Here is a short explanation that will clarify the process for you:

Before you begin constructing your set you should plan your greenscreen studio lights. You need two different set of lights, you would not be able to use on your screen lights the same lights you use for the foreground subjects. The key point of lighting a green screen is to create a consistent shade of color across your entire screen. You will need at least 2 lights, having 4 will be nearly perfect.

You could light a greenscreen studio using a couple of 300-500w lights (one at each end) and a couple of 100-250w lights pointing up. Tip: Using diffusion filters when lighting green screens will help creating even lightning on the screen and reduce the impact of shadows.

Once the screen is lit to your satisfaction, add the main lighting for the subjects just after your screen light are turned off. This new set of lights may create shadows on the screen. Adjust the light positions and filters until you get the best compromise.

More Greenscreen Studio Tips:

a. If you are renting greenscreen studio services try to use the same studio. In most studios there will be some variation in the screen color. If you have your own greenscreen studio at home, use the same green screen.

b. Try to select a part of the screen which best represents the overall color.

c. Make sure anyone appearing in your video will wear green if you're using a green screen. Avoid using green props and other objects in your greenscreen studio.

d. Avoid logos and symbols on people's clothing, after adding the key they become horribly holes in the person's body.

e. Some colors and shades work better than others. For example, dark clothes will create a green rim around foreground objects than light colors.


Come and make some easy fun videos with Greenscreen Studio Frre Guide.

What Kind Of Chroma Key Screen Should I Buy? Start By Asking These Five Questions

1. Why Chroma key Screen?


Chroma key screen for videos is one of the simplest effects you can use to create a home video production. Are you ready for quick magic videos? Do you know how to use chroma key screen?

It looks kind a magic video been created with green screen method. It is a cheap and easy production of videos and films in which two frames are integrated into one.


2. Buy or Make a Chroma Key Screen?


Many people are trying to create videos after seeing the chroma key screen in action. Most of them make their first attempt in shooting a video but fail and stop trying because they are frustrated from the results.

The first thing you need for a chroma key screen is a colored background material. Either green and blue will key well, I use green as my preferred color of choice for a background. Green will present your subject as sharper when you look at them in-studio.

3 issues to discuss when creating a video with chroma key screen:

It all depends on your budget. You can buy one or make it by yourself. If you intend to buy a green screen read about their benefits:
a. Look for buying a chroma key screen that matches the program output.
b. Unlike homemade green screen minor wrinkles are not an issue.
c. You can rape it over people and objects it is a reflective cloth.
d. It may come with lights on the ring.

It is not cheap. However, you get high level chroma key screen effects.
If you just don't have a big enough budget, do not worry you'll still get amazing results by building your own green screen wall.

A trip to a local sewing materials/fabric shop will offer you all sorts of blue and green solid fabrics that you can purchase to create the same effect.

3. Blue or Green Chroma Key Screen?

Green screen is the new version of the chroma key screen effects. Nowadays, green is used because people are using HDV and DV that are compressed formats for video film. For that format, the green color is the key channel that preserves the most color information.

Green will present your subject as sharper when you look at them in-studio. A trip to a local sewing materials/fabric shop will offer you all sorts of blue and green solid fabrics that you can purchase to create the same effect.

Blue screens were used in special effects because they were easy for key out. Blue is also the only color that is not used in skin tones. Blue is still used rarely especially if you cannot be a key blond hair color of your talented actor.

4. Where To Locate My Chroma Key Screen?

The most important thing about shooting a video with chroma key screen has little on what you do in the studio, but everything you do after the shoot. The process of cutting a key will help you understand how to shoot a video with your chroma key screen properly.

I strongly recommend you try and see the final process and how it is accomplished before you shoot your next key. Doing so will open up a world of understanding that no written articles can explain.

When shooting a video with chroma key screen the first thing I would consider is how much area of a colored background I need. If I was shooting a small area a green material with auto-poles and some spring clamps are enough to cover that area.

More important is that all areas around your subject are evenly lit. Make sure that the screen has no wrinkles near the area where the key is to take place. As I know the process, and I have actually done it before, and I know that wrinkles are not your friend.

People with tight budget use their small room or garage with walls colored in white. The white color walls will affect the object you are filming it is going to be greener. You should consider taking care about absorbing the light:

If you have to set up a permanent tight space for your chroma key screen, you might consider:


a. Covering/painting the walls with a flat black. When buying paint for your walls, make sure to specify that you need an interior flat paint
b. If you can, move to a larger location.
c. Use straw/tan gels over your lights to help neutralize the effect.

5. Chroma Key Screen Lightning?

Lighting a chroma key screen is most important to maintain the value of the chroma key color. No need taking a green background and lighting it with a whole lot of light. Actually, you don't need much light at all. All you need is to successfully light your screen with two open-face fixtures placed equal distance from either sides of your background. There is no universal formula to how many stops of light you should have.

After lighting the screen now you need to light the subject. Turn the screen lightning off and light your subject separately. When you light a green screen you light the screen making sure it is properly illuminated, and then you should light the subject in the light of the imaginary setting you are going to put behind him.

Lighting green screens is actually lighting two elements, as if they had been little to do with each other. Try to make sure your subject is far enough from the screen so as not to allow any color from the screen to spill onto the subject skin.

Read More to get yourself the right Chroma Key Screen.


Green Screen Studio Kits - Create Alternate Reality

Green Screen Studio Kits - Create Alternate Reality

Transposing yourself into a new reality has never been easy. However, green screen studio kits are a start. It will actually put you into an alternate reality. A camera, a green screen, and the right kind of software, you can beam yourself into your favorite movie and kiss reality good bye.


Develop Your Green Screen Studio System

There are numerous variations on the standard green screen studio kits technique and you will need to develop your own system based on the resources that are available to you.

Two most important things to consider:


1. The color and lighting of the green screen needs to be as even as possible.
2. In the foreground of the green screen, part of the subjects, nothing can have the same color as the green screen.

Green Screen Studio Kits Planning

Before you begin any construction, plan your budget. Then start planning your studio layout and green screen size:

1. Set up your proposed studio area and camera. Go through every type of shot you could possibly want and measure the total required background area.

2. Allow enough room if you change your mind about widening the shot more than you originally planned.

3. Allow extra space to the sides of the screen to place lights. Leave some space between the green screen and the foreground subjects this makes lighting easier.


Ending up with building a green screen studio that is not quite wide enough can become a big disappointment.

Green Screen Materials

Many professionals will tell you that the color must be just the right shade of green, or that the screen must be made of certain material. It is true, however, in reality you can make an effective green screen from just about any smooth, green surface.

The best possible screen you should do an Internet search for green screen material. There are numerous green screen studio kits with special materials that will suit your studio. Be aware that professional green screen material can be quite expensive.

More likely you would like to have a cheap option to get started with, you will be glad to hear that it is not hard finding usable material.

Here are two main options:

1. A solid material such as cardboard or wood, painted green.
2. Some sort of fabric. You can either buy white material and paint it green or buy green painted material.

Green Screen Studio Kits Best - Fabric or Solid Material

Fabric
Locate a good fabric store you should find at least several choices through their selection:
• The material should not be too reflective
• Lighter, brighter green is better than dark green.
• Wrinkles are the enemy of green screen studio kits, and you will appreciate the material who is crease-resistant.
• Heavy material is good for hiding anything showing through behind the screen.
• Pack up the material for storage or moving, roll it rather than fold it - this helps reduce wrinkling.
• Ironing your material from time to time keeps wrinkles away.

Hang the material in whatever manner suits your situation. You could make a shower rail attached to the wall or even create a mobile screen. To make green screen studio kits mobile, you can use two stands (such as light stands) and mount a rail between them.

Solid Material
Cardboard or wood has the advantage of providing a nice consistent surface, free of wrinkles for any green screen studio kits. The disadvantage is that it's difficult to pack up and move it to another location if you need.

It is better to use a tint designed color for green screens. Look for "chroma key paint" and see the options.

Green Screen Studio Kits Lighting System

Before constructing green screen studio kits you should plan your screen lights. As mentioned before the green screen does require its own lighting.

The key to lighting a green screen is consistency. The whole point is to create a single, consistent shade of color across the entire screen.

You will need at least two lights. As seen in the diagram it shows how you could light a green screen using a couple of 300-500w lights (one at each end) and a couple of 100-250w lights below pointing up.

Diffusion filters are needed when lighting green screens they help creating more even lighting to reduce an impact of shadows.

After the screen is lit to your satisfaction, add the main lighting for the subjects. You may find that shadows are created by these new. Adjust the light positions until you get the best compromise.

Green Screen Sudio Kits Editing System

Once you have recorded your green screen footage you will need to remove the green parts of the image and replace it with your own background.

This is done through a process called chroma keying, which means selecting a color and removing every instance of that color in the image. Any image placed "behind" this image then becomes visible.

Use editing software since this is by far the most common, especially for beginners. Exactly, how you do a chroma key Download the FREE version of the green screen studio kits editing software. The general process used by most applications goes like this:
• Place the green screen footage on a layer in the time line.
• Place the footage or image to be used as the background on a layer below the green screen footage.
• Add a green screen or chroma key effect to the top layer.
• Select green as the color to use in the key.
• Parts of the image will become transparent, and you should see the background appear in these parts. Adjust various parameters to get the best effect.
Get Green Screen Studio Kits Free Demo and Take Part In Alternative Realiity Creation.

Easy Green Screen Program Special Effects

Your Own Studio With Green Screen Program

Green screen program is a great way to create your own video and add special effects to it. Green screen special effects will work for you just great. Are you ready to move to the next step in video creation? Do you know how to green screen you videos?

Before starting the process and buying green screen program you should plan ahead every step of your video creation.


Green Screen Program- Don't Quit On Me

Using chroma key method with the green screen program is one of the most effective tools you can imagine. As a home digital video producer using the technology you have access to tools that will help you create any background for location and special effects you could only dream off.
As long as you practice the green screen program you will learn to isolate people from the background and transform them using the technology to anywhere you want in the universe.

Learning the system and following it principles are the only way you could work with this sensitive green screen program. Before jumping into the studio you should plan ahead if you do not plan every detail ahead you may be having a painful experience in editing.

There are two basic steps to cover before you begin to use green screen program:

Lighting For Green Screen Program

The first thing you should pay attention to. Remember when using a green screen to make sure that every area gets full and equal light.


You should consider two elements when lighting a screen.

1. To get good results with a green screen program it is most important to maintain the value of the chroma key color. You should try to take the color and enhance the light on it so the camera will read it evenly.

No need taking a green background and lighting it with a whole lot of light. Actually, you don't need much light at all. All you needed to successful light your screen with two open-face fixtures placed equal distance from either side of the background.

Normally, you can light screens with less light than the subject. There is no universal formula to how many stops of light you should have.

2. The second point to consider for a good key is smooth and even illumination. You can check with looking through a darkened piece of glass. It will help you see variables across the front of a screen slightly better than your naked eye. Then you can adjust the lights so that the screen will get a more even exposure.


Green Screen Program - Screen Right Distance

A lot of people are looking for a scientific answer about the ratios of foreground to background with a green screen program. There are no rules to this ratio 'thing', your background and your foreground should fall comfortably within the range of acceptable exposure.

You need to make sure to cut down the screen reflection. A distance of ten to fifteen feet away from the screen is adequate.
Light your screens slightly darker than the subject that is because you should illuminate color, not create a bright screen.

Quick Transferring With Green Screen Program

Transferring your subject to a different location is one of the really fun things you can do with a green screen program. To make this look realistic you should know:

a. The new location your subjects is transferred to, and you should make them act accordingly. Look at the video clip ahead and adjust their movements accordingly.
For example, if you plan your objects walking on the moon they are going to have to adjust their movements to low gravity of the moon.

b. If in part of the video your subjects interact with movements in the background you should make sure you know where and at what speed those movements will take place so you could plan ahead.

Read More Information About Green Screen Program


5 Steps To Use Video Chromakey Software In Family Documentary Films

Family Documentary Video With Video Chromakey

The video chromakey sofrware is a great way to your family life memorable for ever. Longing to meet a family member? How many times you felt your picture piled up in the closet?

With this video chromakey technology, you can reorganize family pictures and videos in unforgettable appearance. Are you ready to take out your creativity to the extreme? In the editing process, you can be creative and placed them in any location your imagination will take you.

Step 1 - Collect Pieces Of Media

Creating a family film with video chromakey software fit's the documentary structure because from the beginning documentary films do not have an organized structure, and they usually do not have a script. In place of a script you have pictures and videos from the family "library".

The best documentary films are an exploration into a subject and a collage of different pieces of media, all sewn together into one. As an inexperienced documentary film director this can be a little overwhelming for you as you begin looking at what and how you are going to create an actual film out of it.

On the other hand, you can look at the material you have at home and plan with video chromakey knowledge your film structure. Which of the videos or pictures you have you will use as background, and what you are going to shoot using that background.

However, it is possible to do this effectively only if you will put together an organizational strategy doing this project.
Here are a few steps that will help you how to organize your documentary film:

Step 2 - Pre-Production

Organizing your documentary film should start in the pre-production step. You should research the documentary subject, and all associated subjects, as much as you can. All the materials you have already will help you find an idea and the root of your story so it will make you a clear path can through the general whole.

You may come into documentary pre-production with a general idea of the topic, but you are not sure exactly what you want to do with it. Using video chromakey in this stage will help look through the information you have pictures videos and general knowledge of the subject, see what stands out and starts planning ahead.

After that check how it connects to your own ideas and things you would like to express. This will help you organize your efforts and guide you during the production phase. It does not have to be absolute but should be a start.

Step 3 - Shoot Lists
It is very important to organize your shoot list for your documentary production. A shot list is going to be critical if you are going into what are you filming needs and what are the pictures and videos you can edit with your video chromakey Free Demo.

Make a list of some of these images and videos that you want and keep them in a stream along with open questions, curiosities that came up during research. Add to the list of shoots you plan to take using as a background the stuff you have. Video chromakey will be a great help planning that ahead.

This is going to be more important on later shoots where you will have a much clearer idea of where your documentary project is going and what else you are going to need for that.

Step 4 - Story Outline

The documentary outline is usually the most crucial organizational piece in your project. However, using video chromakey effects will lay out for you the film you want to create and will help in the editing phases.

If you have diced to make your family member documentary film more like a historical document then you can be actually able to prepare a fairly complete outline during the pre-production phases.
If you are doing an emotional piece, more character driven, you can stile do more than a basic outline because you are using a lot of things that have been shot ahead.

Step 5 - Final Editing
When putting together your documentary project with video chromakey you are going to use a lot of shoots taken by you and shots you have found in the family "library".

Organizing your editing steps may be the most important organizational element in the final cut of your production. Import and capture the footage you have chosen from the collection you have into the video chromakey software, then break it up into the small sub clip and label them so that they can be clearly seen as to what they contain.

Give me five minutes a day and i will Show You how to work with video chromakey software.